Tuesday, October 29, 2013

Halloween wraith, er, wreath

I try to add one "crafty" decoration to my collection each holiday, and a couple days ago I realized I had not yet done anything for Halloween!  So I ran to Hobby Lobby and found a grapevine wreath, three flowers, and a ribbon.

I spray painted the wreath black (only one side, because you know, no one can see the back) and glued the three flowers to it.  Add the ribbon and there you go!  I really enjoy it because it's more "vampire gothy spooky elegant" and not so much "cutesy", and since the kids are older that's the look I'm trying to go for.  Not all the time, just around Halloween...

I think the oval wreath really makes this a bit better than normal, and the fact that there were still some leaves on the wreath helped too.

All told, it cost me about $18 and that's because nothing was on sale!  If you plan on making one for next year (or OOH Christmas - I could spray paint it red or green or silver NEAT) I recommend buying your wreath, flowers & ribbon when they're on sale.  Only suckers pay full price at Hobby Lobby... or those who really feel like making a wreath THAT NIGHT!

I enjoy that my kitty is totally checking out what I'm doing.

I could've made it more ornate - but I kind of like it simple.

Sunday, October 27, 2013

If the kitchen is the heart of the home, is the pantry the left ventricle?

Today’s post concerns the pantry.  For many people, this is a small closet of shame and disorganization, but for others, such as myself, it’s a blank canvas upon which to paint your organization dreams. 

Ok seriously though – having an organized pantry is NOT hard and it’s actually really fun to do.  Here’s my pantry, and then steps on how you can organize your own if you need any advice.


First, go look at your pantry.  Most likely you have a TON of wasted real-estate you are not using.  Look up – do you have open space up there?  I did, and I added a simple shelf for holiday items and paper towels (holiday items because I rarely have to get to them, like the coffee carafe and the plate stand, and paper towels because I had no place else for them).  If putting up a shelf isn’t your style, you could hang a basket from the ceiling for packets, vegetables, etc., or put hooks on the walls for coolers, etc.

The other wasted spaces are the walls.  I’ve seen Pinterest posts where people hung dollar-store baskets (like for pencils) to hold spices & packets.  You can hang hooks for aprons, or put a cork board in there for coupons (so when you’re making your list, you can see what you have a coupon for!).

Finally, make the most of your shelves.  Not every shelf has to be the same size.  Put a shelf on your shelf to give you a 2nd layer and keep shallow items there.  Use those “under the shelf” hanging baskets.  My favorite are the little sports bleachers for cans – every time I open my pantry I feel like they’re cheering me on!

Ok now that your space is maximized, group items together.  My system works for me, but depending on your cooking/baking style, you may find different groupings that work for you.  On the top shelf I have baking goods and mixes, because I don’t bake all that much.  I have cookie mixes, flour, sugar, etc.  I also keep extra K-cups up there and coffee filters.


Shelf two I have boxes – rice, mashed potatoes, mac & cheese, etc., pasta & sauces, and cookies, crackers & oatmeal.

Shelf three is all cans – except for Ramen which isn’t a can but it’s a soup so it gets to hang out with the cans. On the home team is canned fruits, vegetables, and soups.  In the middle are ramen noodles & canned meats. Then the visiting team has beans, Manwich, rotel etc.  I figure the home team is stuff that needs no help – we can eat peaches or green beans or soup on their own – but the visiting team bleachers has “recipe ingredients” like beans or diced tomatoes.


Shelf four – bread, cereals, chips, and snacks such as popcorn & Ding Dongs.  Don’t judge.

Shelf five has cat food, dog & cat treats, “overstock” (because the back of the bottom shelf is the hardest to get to), and the kids’ personal boxes (because God forbid they don’t divide everything equally as soon as it comes in the house).
The floor has dog food, soda & water, and a step stool so I can actually get to the top shelf I added.

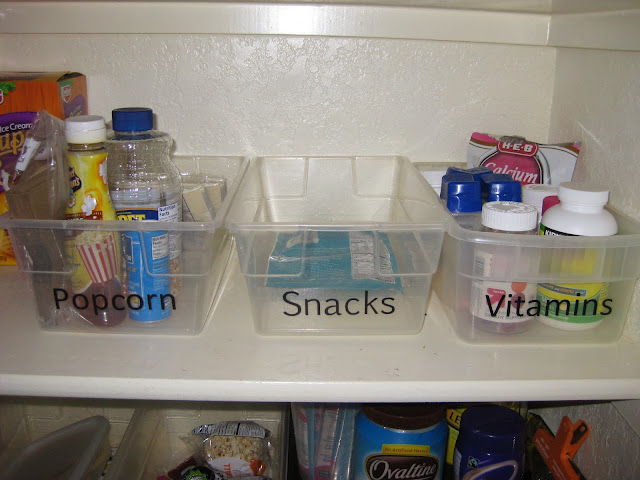
Also notice that when practical, I’ve grouped things into individual bins and labeled them.  I find this very helpful because I can take the entire bin out, if needed, and get stuff/restock/etc.  Also it just looks nice in the pantry and keeps things organized.  For example, all cake/cookie decorating stuff is in bin on the top shelf.  Pets have their own bin for the various treats, heartworm pills, etc.  Popcorn has its own bin because popcorn is the snack of the gods and must be respected.  And of course I used my Silhouette to make labels for the bins, but you could use masking/washi tape, or scrapbooking letters, or just print a label on your computer & attach it with tape.  Whatever works for you isn’t wrong!


So that’s my pantry.  I really need to go to the store (the snack basket is sad). Hopefully it gives you some ideas on how to organize your own.  I’ve seen people use baskets or fabric bins, but I like plastic bins (the kind sold at Target for around $3 each) because they’re a uniform shape, cheap, washable, and clear.

Saturday, October 26, 2013

Finally decorating for Halloween!

My first blog post!  It seems so incredibly self-indulgent, but whatever.  I’m sure there are cats with blogs that will have more readers than me, and I’m ok with that – mostly I just enjoy writing and sharing my random knowledge. And I do think I have a lot of random knowledge, primarily because if I don’t know something, I try to remedy that as soon as possible.

My blog doesn’t really have a theme – the only things tying my posts together will be that they all are things that interest me or that I think I have some sort of knowledge about.  And when I say knowledge, I don’t mean in any professional or expert sense.  Anything posted here will be my thoughts and opinions only, so keep that in mind.  If you decide that my way to do something works for you, enjoy.

I anticipate having posts about organizing and crafting – because I love to organize and I think I’m pretty good at it, and because every now and then I feel crafty (even if I’m not super good at it).  There may be other random topics too – who knows what the future will bring?  Can’t you just taste the anticipation?

SO for this first post – I think I’ll just ramble on about the decorations I put out for Halloween. In the past I would follow a fairly strict (self-imposed) decorating timeline:  Christmas gets 4 weeks (as the boss of all other holidays), Halloween gets 2 – 3 weeks, Easter 2 weeks max, and then all others (Thanksgiving, Independence Day, Valentine’s Day, etc.) get 1 week.  I still refuse to extend that timeline but now that I’m working, the holidays don’t always get their full time allowance.   Thus, today, 5 days before Halloween, I finally put out my crap.

I used to have SO much stuff – but as the kids get older (and I get lazier) I have purged.  Now I’m down to the table by the front door and the tv stand as the two areas that get decorated.  The only exception is, of course, Christmas, because of the tree and the Lego winter village... but basically if it doesn’t fit in those two spots, it’s not going out.  (Ooh, wreaths & wall-decorations excepted of course, but I’m really cutting down on wall-hangings).

So what do I have out this year?  Under the TV I have some pumpkins – gold ceramic ones, wooden ones, and some nice plastic ones.  I like the pumpkins under the TV because they can stay there until Thanksgiving... it’s more “autumn” than Halloween.


On the entryway table, I have a fairly cheesy tree with mini-ornaments (the first to go if I ever find something I like better), a wooden owl that used to be a wall-hanging (but I found an extra tall ornament stand for it), a wine glass full of spiders, a box full of eyeballs, and some bottles of potions. 


I really enjoy the glass-o-spiders.  I took a plastic wine glass that had gotten all “crackly” in the dishwasher and filled it with “table confetti” from the Target dollar spot.  It was cheap and I think it looks pretty neat.  


The potion bottles – one is an old tequila bottle, one’s from vodka, and one’s from spaghetti sauce.  I removed the labels with Goo-Gone (best product ever) and attached labels I had downloaded from the internet.  I’d love to give credit to whoever designed them, but I don’t remember (I made them last year before I even considered blogging).  I printed them on sticky-backed paper and cut them out with my Silhouette, so that was extremely easy.  The “elixir of arachnid” has little plastic spiders in there (I need to add more, but I didn't get a chance to run to Target yet), the eye of newt has plastic eyeballs, and the “Potions” is just water with a drop of black food coloring.


The box of eyeballs is a craft I’m super proud of.  I saw the saying on Pinterest, on just a block of wood or in a frame or something.  I found the box at Hobby Lobby, already painted black, and decided to use that as my “canvas.”  I cut the letters out with my Silhouette, but didn’t like the way the vinyl looked on the box.  Instead I used the stencil left behind by the letters, put it on the box, painted the letters with silver paint, and then removed the vinyl stencil.  I’m so pleased with the way it turned out!


Ok well there you go – my first ever blog post.   Happy (almost) Halloween!